Brazil 2016

Friday, July 29, 2016 1 comment
 I genuinely believed I would not be in Brazil this year. (Click on Brazil below to read more about the missions over the previous 5 years).   It's a good thing I have wiser friends and a big God who intervenes in my worldly thoughts.  It's a long story, but the short version is my house is literally falling apart (roof, new ac unit, plumbing back up etc), and I am currently holding my car together with duct tape (I wish I were making that up).  There have been family circumstances that require a lot of attention and I just thought....not this year.  I didn't see a way.  I told the team I wasn't going.  Twice.  One member put a deposit down for me, and then a few good friends that know my heart, and believed in the mission long before me blessed me and I found myself in Brazil.  It was a bumpy ride (plane delay upon plane delay, boat delays due to paperwork not being completed because the whole country was on vacation it seemed....all except for the military (who stopped us five times)).  There were bumps in the villages, but in the end, there was peace because I know where I was supposed to be...it would be impossible not to know after the journey that came before.
 I love Brazil.  I consider the people I've met there family and I'm homesick for them already.  I was homesick just hours after leaving them.  Some of the best people I've ever met call it home, and meet me on this boat each year.
 I can't tell all the stories in a blog post, but I can share a few photos.  Kids holding bibles of their own for the first time, ladies getting pampered, medical and dental teams coming to villages in desperate need because an already difficult journey is almost impossible now with a chaotic country government.
 One of our team members began a Bucket Ministry after encountering all the people along the river sick from drinking the parasite rich water.  He raises funds all year for filters, and parasite medicines for each family member.  The team goes village to village and trains the people on how to use the buckets, and they also share the story of living water that last longer than the seven years these buckets promise.
 Each day the team splits up and spends time with the children (vbs and this year....water balloons), women, and men, and we also walk house to house to meet those who are unable to come to us.  I believe in missions that don't take me any further than my house, my next door neighbor, and my city, but I also know God sends us to all the nations until all have heard.  I'm blessed to get to make this journey and see the harvest God has prepared along these shores.
 The last few years we have added a Tex Mex dinner for our translators and boat crew.  When we leave, these folks remain-continuing the mission with the missionaries who call these villages home.  These are truly my brothers and sisters and I look forward to the yearly family reunion on these boat decks each year.
I'll pray about next year, but in the meantime, I pray for these folks I left behind on the shore.  I can't wait to hear updates, and I can't wait to be able to revisit these friends someday in heaven and introduce all those that made it possible to all those I got to spend a few minutes with on this side of heaven on the shores of the Amazon River.  

Cotton Branch Wreath

Wednesday, July 27, 2016 No comments
I'm a little late to the party, but in my defense....it took me forever to find cotton branches.  I heard they sold these at Michael's....and I finally found some in the fall section this year.  I purchased seven branches one week when they were 40 percent off.  
 Instead of using a wreath frame, I just used some brown wire (also bought with a coupon) to tie together the branch that I curved into a circle and connected.
So....for less than 30 dollars (I don't know the exact amount) I made one of these wreaths that usually cost at least 40 dollars+.

Snowman Spoons

Monday, July 25, 2016 No comments
 I used this technique to paint some wooden spoons that were hanging around my house.  My goal this year is to start getting rid of things I bought for projects I didn't do/or had to buy in larger packs than I needed at the time.  It'll take me years to purge, but....I'm four spoons lighter now.  My mom has a craft/antique booth and the plan is to throw these in there next Christmas.  I'll be creating some more friends to join these little guys, but...here's a start to purging, but more importantly...to Christmas crafts!

Mini Unicorn Pinata

Friday, July 22, 2016 No comments
 I made my own mini donkey pinata a few years ago to fill with a gift card to a local Mexican restaurant.  Here are those instructions.  Recently I saw a unicorn pinata online, and it was my intention to make another pinata....the unicorn version, but then I ran across some mini donkey shapes already put together at Hobby Lobby.
 I used a coupon and picked up a three pack.  They also sold the fringe (this is not an ad-seriously, I just hate trying to search down products), but I just bought some tissue at the dollar store.
 I cut the tissue into strips.
 I glued strips down the main, overlapping them a little bit.
 I just used regular old glue stick.
 I did the same thing with the tail, but instead of having it go to the side like the main, I had it go towards the back.
 Here's a look at the finished main.  It doesn't have to be perfect b/c you are going to go over it with the white.
 The tail is also where the opening was.
I slipped the gift inside.  
I then took white tissue and I covered the body with fringe.
I took a gold piece of scrapbook paper and glued it into the shape of a cone.
I glued a little strip in the cone, and used that surface to glue it onto the head of the unicorn.
I have two more of these guys....I think I'm going pastel with the next one, and then....who knows, the sky is the limit.

Baseball Wreath

Tuesday, July 19, 2016 1 comment
 I'm headed to GMT today to demo some summer wreaths.  I've been posted those tutorials over the last few days.  I'll post the video later on facebook, but in the meantime, here is the final wreath.
 I'm going to demo this bubble wreath on Good Morning, Texas.  It's soooooo simple, and requires no glue.  I decided to deck this guy out for baseball season.  I bought all these ribbons at Hobby Lobby for half off (they sell their ribbon at half price for 50% off every other week, so...check your adds..if they aren't on sale this week, they will be next week-this makes them 1-2 dollars).  I did go to JoAnn for the baseball ribbon.
 I just found places all over the wire frame within the bubbled burlap and tied a knot until it was totally covered.
I found some used baseballs from a thrift store nearby, and a chalk board to write messages on (perhaps the score?) and I added those as well.  I'm ready for a (continued) great season, Rangers.

Dollar Store Wreath

Monday, July 18, 2016 No comments
 I put this wreath together for less than five dollars (and half of that was for button covers).
 I got this wreath form at the dollar store.  I found this ribbon in the clearance section at Hobby Lobby for less than two dollars (and I only used half), and then I bought a few scraps of felt and burlap.
 I glued one end of the ribbon to the wreath and then wrapped it around the wreath/glued again when the two ribbons met.  I just made some simple felt and burlap flowers using some of these techniques.  I also bought these buttons for half off at Hobby Lobby and used some scrap fabrics for the center.

Dear Younger Me,

Sunday, July 17, 2016 No comments

    I turn 37 tomorrow.  I've reached the age in my life where I forget what my age is when people ask.I really thought I was 35 all year until my friends starting turning 37.

    There are moments when I think about where I thought I'd be.... I was going to be married.  There would be a couple kids.  My house would be clean.  My dog would be well behaved.  For sure, the front yard would have been landscaped.  I was going to be thinner....not thin, just...not so not thin.  What's up with the gray hair?  That was no where in the plan.  If it was, I was going to have more money to pay to cover that stuff up.  College loans, those were going to be paid off years ago.  

     Those don't define who I am at the moment.  This wasn't the life I had planned, but I could not have even written in the plans the incredible friends I'd meet and get to keep along the way.  The countries, states, and places I've been able to visit.  I've accomplished goals I never even thought about wanting to do because God provided moments and motivation to dream up some new, pretty incredible goals and adventures.  I've had a front row seat to answered prayers and miracles.  I don't know what the future holds.  I don't know if I'll get to check off any of the things from my "Once Upon a Time" list of expectations, but should none of those things ever come to pass, I know it's going to be a great adventure through year 37 and beyond.

   I will now pick up my birthday soap box and leave with this song....it speaks to me.  So if you are struggling with the age thing, the life expectations and life mapquest directions taking you down a different road than the one you thought you should be traveling, regrets from paths begun that diverted you from God's plan, this puts me back on track...

Watermelon Wreath

Friday, July 15, 2016 No comments
 I've seen versions of this wreath around for a year now.  One of my friends threw a watermelon themed birthday for her daughter last year, so we discussed some pins (it turned out super cute).  I'm going on GMT next week, and I was tasked with bringing some summer themed wreaths, so this was one of my choices.  My goal is to show several different techniques for making some easy wreaths.
 My favorite part of this wreath is that you can find these wreath frames at the Dollar Tree.  You can also find them at craft stores, but....not for a buck.  You could use scraps, but....I decided to just buy a few yards of fabric (one of each to be exact).  I did a version of this a few years ago for Halloween.  That post lives here.
 I cut the fabric into about half inch by 4 inch pieces.  You can make it longer for a fluffier wreath.  I then just started tying on my pieces.
 Green all around the outside (you'll fluff them later).
Once I had a row of green, I did the light pink, and then (last) two rows of bright pin, with a few black throw in for 'seeds.'  I did the black ones at the end after I had fluffed out the fabric tied on to space the 'seeds' out evenly.  It's certainly not a difficult wreath-but it takes awhile (an hour + to tie all the fabric onto the frame), so....my dog and I watched episodes we recorded from Shark Week!  The only key is to tie it close to the middle of the ribbon, but once you do a few, you will get the hang, and if any are just totally uneven, pull it off and tie again, or just trim the longer end!

Buttered Biscuits

Thursday, July 14, 2016 No comments
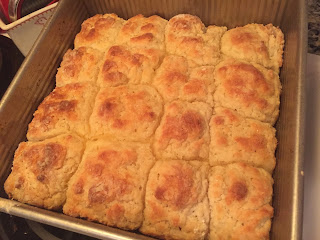
 I recently made some biscuits from scratch. A gal I knew via church who loves to cook posted about these on facebook (thanks, Cindy, if you ever run across this) and I gave it a go.  The original post was via the bluejeanchef.   They were really buttery and delicious, and there were a few steps I had never done before that I'll definitely be trying out with other recipes that need cold butter (pie crust?).
This ones a keeper.
Ingredients:  2 1/3 c. bread flour, 8 t. sugar, 1 stick of butter (stick it in the freezer for an hour or so), 1 1/3 c. buttermilk, more butter (for greasing the pan and to brush on the top of the biscuits towards the end of cooking), regular flour (not the bread flour)
Instructions:
Preheat Oven to 425
1.  Mix the bread flour and sugar.
2.  Grate the butter into the dry mix.
 3.  Stir together until butter crumbles are coated, but don't over mix.
 4.  Add buttermilk.  Stir again until just mixed, but crumbly.  Again, don't over mix.
5.  Add about a cup of flour to a bowl.  Take a spoon and drop a ball of dough into the flour (about the size of an egg).
 6.  Toss around and coat.
 7.  Drop into a buttered 9x9 baking pan.  Set each one next to each other.
8.  Bake at 425 for 25 minutes.  Pull out and brush the tops of the biscuits with about 3 T of melted butter.  Cook at additional five minutes to brown.